User:Andyp/BDRR
From #openttdcoop wiki
Bi-Directional Roll-On, Roll-Off Stations
-->Still slowing adding pics and clarifying text, if anyone has suggestions to clarify anything here drop me a line on IRC, or leave a note on this articles discussion page<--
Contents
Why Bi-Directional Ro-Ro (BDRR) stations?
A big advantage of BDRR stations over traditional ro-ro layouts is that looping traffic around to one side is not required. When building a station relatively close to the ML all that needs be done is to get traffic from the far side of the ML across the near side. There is no need for trains from one direction to make a 180° turn before entering, or after exiting the station. Stations can be built so that the only complete reversal of the direction a train is traveling in occurs in the platforms, provided this ability is enabled in the difficulty settings, which for #ottdcoop games it is. This allows for the stations to be built closer to the ML allowing for shorter traveling time from ML through the station and back to the ML.
However, BDRR stations are not well suited to every situation. They would be very wasteful if built along a one way ML. They typically have a more complex track layouts than traditional ro-ro stations as there is an entrance and an exit on both sides of the platforms. It is more difficult to make every platform available to every entering tack. For a given number of platforms, a BDRR station will almost always take up more space than a ro-ro. Trains must be entering and exiting from different directions, as in a secondary industry drop station. Generally at industry pickup stations trains are arriving and departing a uniform direction, a BDRR in these cases would be needlessly complicated.
Throughout this page I am choosing to ignore layouts that allow entering and exiting traffic from different platforms to interfere with one another, so no evil-x's or mess-o-track PBS layouts.
Considerations when building a BDRR
The three most important things to consider when building a BDRR are:
- number of platforms
- train length
- curve length
- (add breaking space?)
When choosing the number of platforms, there must be enough to meet the demands of the trains using the station, but too many creates a very bloated station. Under ideal circumstances I like to have five platforms per entrance, as five platforms are generally enough to meet the demands of a single entry delivering trains at full capacity into a station. However as this is rarely the case, five platforms per entry is generally not needed.
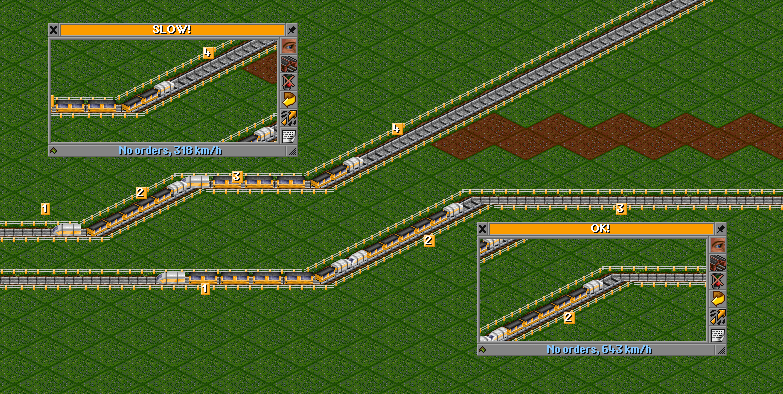
Train length is important in its own right, and not just a factor in curve length. Since trains suffer a penalty when encountering track with four or more sections of turns in one train length, attention must be paid to this. With how tight I like to build, I use a section of track TL-1 in length to allow trains to straighten out before entering another curve (elaborate). Although this will not apply in every case, it may be possible to use shorter straight sections.
re-make this one, the fast train is only on two sections
The train on the upper track is divided between 4 sections of turn within its length, while the lower train is only on three sections of turn within its length. The upper train in this case lost just over 50% of it's speed because of too many turns within it's length.
Curve length is obvious and commonly dealt with in #openttdcoop games. As it applies to BDRR layouts, I find myself having to make modifications to accommodate train length more often than curve length. Be sure to built a test track and test the curve length with the actual engine and wagon combination(s) being used, as curve length is often less than TL.
When building a station to serve two different train lengths, build to the longest TL and the longest CL, they may not be for the same train.
Ideally it is best to split entering and exiting trains as soon as close to the platform as possible. The quicker this can be accomplished, the quicker the platform is ready for the next train.
Pre-Signals vs Path Signals
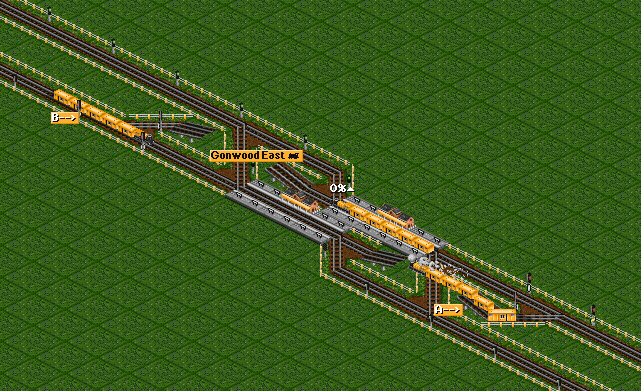
This is one instance where I feel path signals have a distinct advantage over pre-signals. With pre-signals it is possible, and likely, that trains entering from both sides of the station will choose the same platform. This means one of them will get to the station, and the other will be stuck in the pre-signals waiting for a green light. It is possible that a train stuck in the pre-signals will block access to all platforms from it's side of the station. To avoid this waiting spaces can be used, built so that trains are choosing waiting spaces, not platforms (put a regular block signal before the station). This can add considerable length to the station. Using path signals has the advantage that trains not only choose platforms, but reserve them as well. Every train passing the path signal has a platform, a train from the other side cannot "steal" it. One important design consideration with path signals is to keep the distance from signal to platform as short as possible. This is because a platform is reserved for the entire time it takes for the train to travel from the path signal to the platform, then out of the platform again. Trains should get in and out of shared track blocks as quickly as possible to make way for the next train.
In this example the trains at A and B reached their respective entry presignals at the same time. The exit signals for the empty platform both showed green, so both trains were allowed to pass their entry presignal. Train A passed the exit presignal an instant before train B reached its exit presignal, so train B must stop. Since train B has already chosen a platform, it is now blocking access to the eastern platform from the northern station entrance.
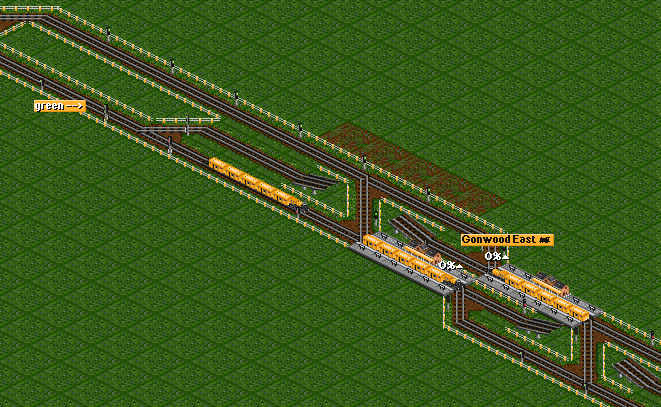
This example uses presignals with waiting spaces built in. I used an entry-exit-block signal arrangement instead of an entry-combo-exit arangement because in the latter a train can get stopped between the entry and combo presignals, leading to the same jam situation as the previous example. Using entry-exit-block causes trains to choose waiting spaces, not platforms. The upside of this behavior is that trains will never block the presignals. The downside is that trains may end up waiting for a longer period of time for an empty platform, in this example is the easter train leaves first, the waiting train has already chosen the western platform and has no way to get to the now free eastern one. Waiting spaces also add length to a station, not only to fit a train, but a signal was also required after the bridge.
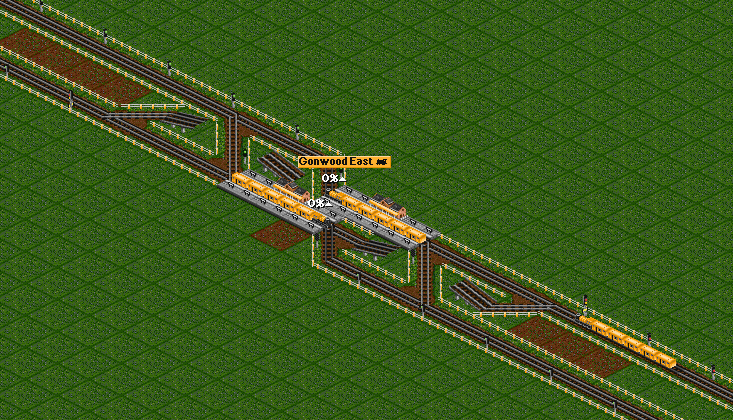
This example uses the same track layout as the first, but uses path signals instead of presignals. Now trains wait in a position to choose either platform, and will only pass the path signal if they are able to reserve that platform, two trains can never choose the same platform at the same time in this arrangement, but waiting trains will be able to access the first available platform. The major challenge with using path signals is that it is very important to minimize shared track. Split the trains from the single entry track to platform specific lines as soon as possible or trains will start to back up at the path signal. This is due to #openttdcoop's two tile signal spacing, for optimal flow trains must clear shared track within this signal spacing or there is the potential for trains arriving in a closer spacing than the entry can manage. This becomes more difficult the larger the number of splits to make. Splits need not occur all at once, but can occur in multiple stages, or branch out. Always consider the 2 tile signal spacing that trains will be traveling at as they approach the station. (seperate point?)
Inherent choice vs load balanced
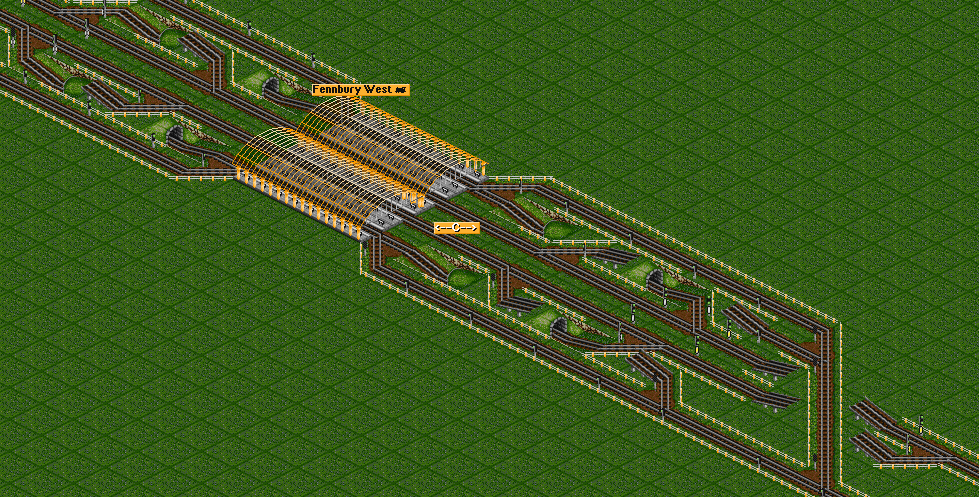
I am using the term inherent choice to describe a station where each entry has a built in choice of every platform. This can be a daunting task with BDRR stations as the stations become very large, very quickly. Generally I have been using sets of smaller station building blocks, and using a load balancer to distribute trains among the station sets. An example is in PSG #127 at the coal drop station. The ML in this game is LLL_RRR, so I built three sets of three platforms and used a 3to3 load balancer in front of each entry. This worked well for a time, but 154 trains is proved more than 9 platforms can handle. I worked out a four track layout that fit into the same amount of space (lengthwise) as the three platform layout (shown below). This 12 platform station (3x4) was able to handle the load presented to it.
Relationship with terminus stations
BDRR layouts and terminus stations are closely related. If you take a terminus station and mirror it about the platforms, you have a BDRR. However, it may not be the most efficient BDRR. I consider the Osai style terminus station to be a very good terminus station, but an inefficient BDRR.
The two center platforms have four tiles of combined entry/exit track on each side, compared to one for each of the outside platforms. The result of this is that trains leaving the center platforms have to travel three tiles farther before a new train can enter that platform. When I use this layout as a terminus station (frequently), I stagger the platforms to take up the extra three tiles, per the comment by TheTiger in Osai's Terminus Station Tutorial. But in a BDRR layout, staggering the platforms merely shifts all of the combined entry/exit track to one side of the station.
(add pic to illustrate)I also tend to view each bridge over tunnel as unnecessary. When the flow of trains through the entry is considered, trains enter one at a time, as they are delivered to the station by the sideline. There are two distinct station functions, drop and pickup. When this layout is used in a drop station, all trains will spend an equal amount of time in the platform to unload, assuming of course full trains, trains of varying cargo loads will follow the pickup model. Two trains arrive at the station one after the other. Each train enters without waiting and unloads. So the first train enters the station such that by the time it has cleared the exit, the second train will just be finished unloading. When both trains are clear of the station exit, they are spaced apart the same distance that they were before they entered the station, without interference from the lack of a waiting space on the exit. When used as a pickup, again consider traffic flow. In the event that two trains in adjacent platforms (sharing an exit track) finish loading at the same time (think of a farm), then both trains leave their platforms at the same time. One train will cause the other to stop partway out of the platform. However, the stopped train in the platform does not cause any problem with entering traffic as that traffic is still entering one at a time. The exiting train that is moving, will clear the exit, and a train from the entry may now choose the associated platform. While this new train is entering, the stopped exiting train may begin moving through the exit. By the time another train is at the station entrance, the second platform is now clear.
I also tend to favor bridges over tunnels, as bridges can have built in elevation change, which in some cases can cause a bridged crossing to be a full two tiles shorter than a tunnel crossing.
Gallery and explanation of some BDRR building blocks I have come up with
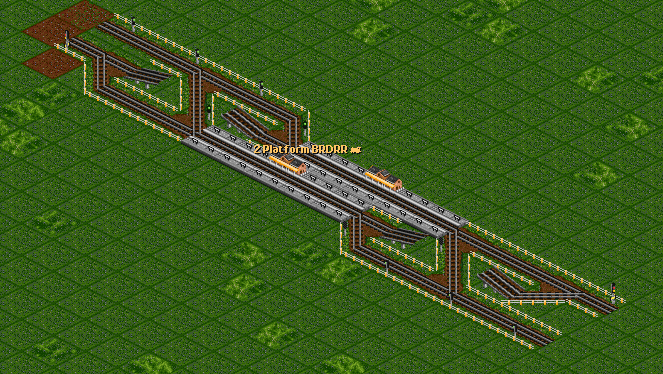
2 platform building block:
This is a very simple arrangement. The platforms are staggered by two tiles (three for presignals with waiting space, as an extra tile in needed between the bridge and platform). I used path signals for the example, but presignals could also be used as previously explained. Using path signals the entry layout on either side will work, if using presignals the entry on the right side must be used (no room for an exit signal before the bridge on the left side). There is built in breaking space of three tiles for the near platforms, and five tiles for the far (over the bridge) platforms. The entry/exit split occurs immediately before/after the platform tiles, so there is a single tile of shared entry/exit per platform. The station is four tiles wide overall, but only three tiles wide at it's widest point. As a BDRR, this layout is fairly limited simply do to it only having two platforms. Might work well as an outlying station in PAX games. However, as a terminus station, this is by far the most common layout that I build for primary industries.
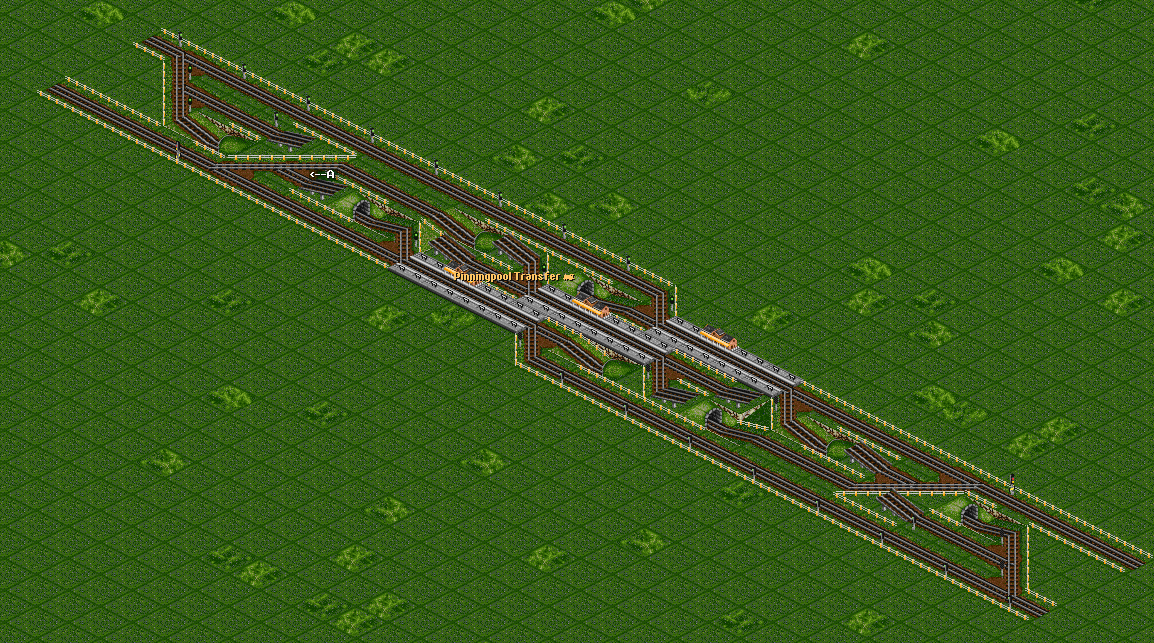
3 platform building block:
This is an expansion of the 2 Platform layout, just above. It is built on a three tile stagger due to the tunnels. Presignals can be used if one tile is added at A. Built in breaking space is five tiles for the nearest platform, seven for the middle platform, and 10.5 for the far platform. Each platform has a built in waiting space of at least ten tiles on the exit. Or, if the entry and exit arrangement was switched (mirror the station about it's long axis, or drive on the left), then this would work for a situation requiring up to ten tiles of breaking space (possibly realistic with very long maglevs). I used three of these station layouts built next to each other for the original coal drop in PSG #127 (a 3-3 mixer was built before the entry to allow traffic from all three ML tracks to access all nine platforms). (insert pic of original PSG127 station?)
4 platform building block: (pic) (explanation and key points)
5 platform building block: (pic) (explanation and key points)
2 entry/2exit per side inherent choice BDRR station (pic) (explanation and key points)
